Building a cabinet for my MEDAL COLLECTION *************** Final product, FINISHED! pics in the OP
 Bodin
Posts: 1,022 ✭✭✭
Bodin
Posts: 1,022 ✭✭✭
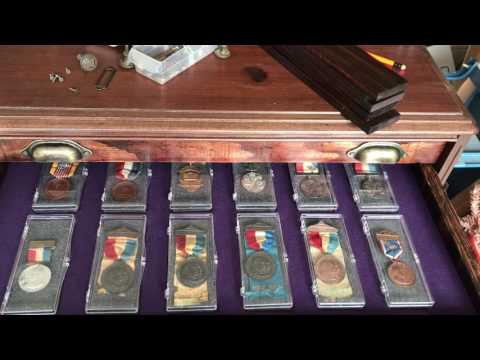
The collection I'm most proud of, are my Presidential Inaugural Medals.
They go back to Benjamin Harrison but even further if you count inaugural tokens.
That said, they are large. Mostly 70mm but I have one as large as 105mm. I've been storing them in riker boxes stacked under my desk.
This has always bothered me since I'm so proud of the collection so far......and they're in boxes.....on the floor.
SO:
I decided that I wanted an "architect's cabinet/map cabinet/flat cabinet" for my collection to be better housed/displayed.
I looked on ebay, pintrest, and etsy at architect's cabinets, and wow....they're expensive.
So now I'm building one. - With little-to-no experience
Here is my journey below:
I will update new photos and information as I go.
Please feel free to show/post anything numismatically related that you have built.
Inspire us!
These are a couple of the medals in my Inaugural collection.


This is the inspiration piece I found on Pintrest. (NOT MINE)

I thought it best to convert an antique cabinet and build it new drawers.
First I needed to find just the right piece!
CRAIGSLIST, Here I come!
After a few weeks of searching, I found an old(er) dresser in Monrovia, CA, roughly an hour away from me. $80. It's PERFECT!
Here it is as soon as I got it back to my place:


So here is a rough sketch of my plan:

First thing to do is remove all the brown paint and old sealant that is on it. I HIGHLY recommend Citri-strip. I DO NOT WORK FOR THEM AND AM NOT SELLING ANYTHING. It just did a damn good job on removal of the layers, and most importantly, I never sanded a thing!
Here is after all the layers had been removed:


I'll do a light sanding and stain the piece after everything is built. So the next step is to start building some drawers. Riker boxes are 1in deep and that is just fine. However, DAMN that would be thin drawers. I settled on 2in drawers with the face of the drawer being 2 1/4. To see how cheep I could be, I decided to make the drawers of super-cheap plywood(sanded and stained OR painted(haven't decided) and put a beautiful pine face on them(stained in the final step of course).
The drawers look VERY thin, but in the end, I think you'll see that the size is great......I hope.


If you look at the above photo on the left, you'll see that the wood holding up my rail for the drawers is a piece of plywood that I cut to fit into the existing grooves on the inside. Therefore, I may be able to build this without adding a single nail or screw-hole to the dresser.
Once I get all the drawers in, Ill set a lock so that the depth to which the close is decided. I don't know if I want the drawers flush with the face or recessed a little.
Now that I've built 1 drawer, I have 10 more for the bottom section.
_______________________________
Saturday 9/17:
I finished cutting and putting in the second shelf.
I'll post again once I have many more shelves and not just every time I add something. That would be a boring thread.

_________________________________
Wednesday 9/28
Busy week for me. Shot a Verizon/iPhone commercial. https://youtube.com/watch?v=1Xu-s4UbFgo
That was fun, but that meant I haven't worked much on the cabinet, however, here is where I am as of this evening:
I have 5 drawers completed. 6 more to go on the bottom of the unit. 4 I think for the top if I want all of them to be the same size. I am toying with the idea if doing something different on top. Not sure yet.

As for the drawers, I'll cut 3/4in foam to fit my drawers and then arrange the medals how I like and then cut out the foam so that the medals sit recessed. Look at my photo at the top of the thread for reference.

Now, my next question is what do y'all think I should do with the inside of the drawers?
A. Leave it as just foam. Still looks good.
B. Cut in a fabric over the foam so it's smoother and sleeker.
I'm thinking about going with Purple

Here's a VERY ROUGH mock up. Keep in mind: the medals will be recessed(not sitting on top), the fabric will be smoothed to remove wrinkles before bonding, and the wood will be a dark stain when complete.

______________________________________________
Friday Oct. 14th
I got another cool job. I'm guest starring on NCIS, so I have been tied up again and my work has been slow.
That said, we're getting close to the finish line as far as construction goes. All the drawers are built and their pine faces have been added. I've decided to make a slightly larger drawer for the bottom(since my measurements were off), and I've got to set all the drawers for the top.

_________________________________________________
Thursday Nov. 10th
I've been delayed, AGAIN. but here is the status as of today:
I looked EVERYWHERE FOR 30 pieces of matching ANTIQUE hardware..... IMPOSSIBLE. And when I did find something, EXPENSIVE!
I settled on chinese knockoffs. at $21 for the 30 pieces. I'm.....content with them.....for now. I ordered 10 at first because at $7, I wanted to see what they looked like at an inexpensive price tag. That is why only 1/3 of the pulls are attached. I will remove the pulls before staining. I just wanted to have my holes drilled and see if I like the look of the pulls.
The drawers are all built and set finally!
-The final steps are:
-fine sand everything,
-vacuum/wipe down everything,
-stain interior and drawers first,
-stain cabinet and pine faces last,
-put hardware back on,
-upholster/foam in interior of drawers.
THEN FINISHED


______________________________________________________
Tuesday Nov. 15th
Things are starting to shape up, as its time to make some STAINS!
Here is a photo of the operation(I've already stained the cabinet here, but will wait to show you the whole thing in the reveal)

I used Pre wood conditioner, then Red Mahogany stain, and will follow up with wipe on poly once I have the desired color.
Here is AFTER the first staining pass on the LEFT and after the second pass on the RIGHT. I'll probably do a third coat on the drawer faces

This is after the pre wood conditioner on the LEFT and after 1 coat of stain on the RIGHT. This is my desired hue for the cabinet.

Now for INSIDE the drawers, I decided to start with the medals with ribbons first.
I have small plastic hinged boxes for the medals to reside in. This is for 2 reasons: 1 to contain an otherwise dangly(for lack of a better term) medal in a confined space, and 2, an extra layer of protection.
I will cut my 1/2 inch foam to fit the box and use their existing pins to hold them in place.


I haven't done it yet, I will cut the foam so that each box sits into it, NOT on top of it.

_____________________________________________________________
Tuesday December 6th
Here is the cabinet the last month waiting for me to get back to work on it.
about the photo below:
1. I hadn't finished matching my stain on the drawer faces to the cabinet color
2. this photo shows the different phases of work. drawers missing faces, Pine faces in and ready to be stained, and staining already in process.
AGAIN, The below photo is NOT how the cabinet is going to look (as it looks like crap here)

_______________________________________________
So you know,
The cabinet is FINISHED!....the drawers, are NOT. I will show the whole cabinet when finished with everything
_______________________________________________
Drawers:
First step, use wood conditioner, and 1-2 hours later I stained the insides and outside with Red Mahogany. Let it dry over night. Then did a second coat for desired color. The reason I DIDN'T stain the inside bottom, is because it would be wasteful, as it will be covered by fabric and foam....you'll see.

Then I stained the bottoms(underside). One coat is enough, as the bottom shouldn't be seen anyway.

*** I COMPLETELY FORGOT to photograph the next step, which was polyurethane. I chose to use Glossy for the drawers. I'm happy with the results as you'll see in the photos below. Remember that I used SATIN on the drawer faces and the cabinet exterior.
Now, to build the interior of the drawers.
There are 14 drawers. 4 on top, 9 on bottom, with a 10th on bottom that is twice as deep.
The top 2 will be for Pre-Official Inaugural Medals: Jefferson - Cleveland
The next 2 will be for Inaugural Committee badges Harrison - McKinley
The bottom 10 will be Official Inaugural Medals: Mckinley - Trump(should be an ...interesting medal)
I'll start with the Committee Badges:
I took a drawer, cut dense 1/2in foam to fit the bottom of the drawer. Placed my ribbon boxes exactly how I wanted them. Measured and re-measured to insure my OCD was satisfied. Then I used an X-acto knife to outline the bottom of each box cutting the foam away.

I then placed the boxes in their spots to make sure everything lined up and no changes had to be made.

Next step: Fabric
I bought some purple fabric (ala the Pan Pac set above) for the drawers. I lightly dusted the foam with craft adhesive and gently tapped so that everything bonded. Let it dry overnight.

Make a couple incisions with the X-acto blade and the ribbon box will slide right in.

Finished product:


Here it is IN ACTION:
 https://www.youtube.com/watch?v=mCvjAay7IdE&feature=youtu.be


Now I have 13 more drawers to foam/cut/fabric, and then I'll be ready to show you the final product.
SHOULD BE FUN.
V
V
V
V
V
V
V
V
V
V
V
V
V
V
--------UPDATE, Monday January 9th
FINISHED PRODUCT,
final expense total = $399

I'm quite happy!


Thanks for following my journey,
-Charlie
NOTE
*** I already had a saw, dremmel, straight edge, protective eyewear, drill, bits and some plywood.
Items bought so far:
Dresser - $80
Citristrip - $10
nails - $10
Screws - $10
Pine - $38
Sandpaper - $40
Plywood - $42
Foam - $24
Handles - $26
Stain - $30
Pre wood conditioner - $15
Poly - $30
rags - $4
gloves - $3
Foam adhesive - already owned
Purple cloth - $32
Label tag holders - $5
TOTAL amount spent to date = $399
They go back to Benjamin Harrison but even further if you count inaugural tokens.
That said, they are large. Mostly 70mm but I have one as large as 105mm. I've been storing them in riker boxes stacked under my desk.
This has always bothered me since I'm so proud of the collection so far......and they're in boxes.....on the floor.
SO:
I decided that I wanted an "architect's cabinet/map cabinet/flat cabinet" for my collection to be better housed/displayed.
I looked on ebay, pintrest, and etsy at architect's cabinets, and wow....they're expensive.
So now I'm building one. - With little-to-no experience
Here is my journey below:
I will update new photos and information as I go.
Please feel free to show/post anything numismatically related that you have built.
Inspire us!
These are a couple of the medals in my Inaugural collection.
This is the inspiration piece I found on Pintrest. (NOT MINE)
I thought it best to convert an antique cabinet and build it new drawers.
First I needed to find just the right piece!
CRAIGSLIST, Here I come!
After a few weeks of searching, I found an old(er) dresser in Monrovia, CA, roughly an hour away from me. $80. It's PERFECT!
Here it is as soon as I got it back to my place:
So here is a rough sketch of my plan:
First thing to do is remove all the brown paint and old sealant that is on it. I HIGHLY recommend Citri-strip. I DO NOT WORK FOR THEM AND AM NOT SELLING ANYTHING. It just did a damn good job on removal of the layers, and most importantly, I never sanded a thing!
Here is after all the layers had been removed:
I'll do a light sanding and stain the piece after everything is built. So the next step is to start building some drawers. Riker boxes are 1in deep and that is just fine. However, DAMN that would be thin drawers. I settled on 2in drawers with the face of the drawer being 2 1/4. To see how cheep I could be, I decided to make the drawers of super-cheap plywood(sanded and stained OR painted(haven't decided) and put a beautiful pine face on them(stained in the final step of course).
The drawers look VERY thin, but in the end, I think you'll see that the size is great......I hope.
If you look at the above photo on the left, you'll see that the wood holding up my rail for the drawers is a piece of plywood that I cut to fit into the existing grooves on the inside. Therefore, I may be able to build this without adding a single nail or screw-hole to the dresser.
Once I get all the drawers in, Ill set a lock so that the depth to which the close is decided. I don't know if I want the drawers flush with the face or recessed a little.
Now that I've built 1 drawer, I have 10 more for the bottom section.
_______________________________
Saturday 9/17:
I finished cutting and putting in the second shelf.
I'll post again once I have many more shelves and not just every time I add something. That would be a boring thread.
_________________________________
Wednesday 9/28
Busy week for me. Shot a Verizon/iPhone commercial.
https://youtube.com/watch?v=1Xu-s4UbFgo That was fun, but that meant I haven't worked much on the cabinet, however, here is where I am as of this evening:
I have 5 drawers completed. 6 more to go on the bottom of the unit. 4 I think for the top if I want all of them to be the same size. I am toying with the idea if doing something different on top. Not sure yet.
As for the drawers, I'll cut 3/4in foam to fit my drawers and then arrange the medals how I like and then cut out the foam so that the medals sit recessed. Look at my photo at the top of the thread for reference.
Now, my next question is what do y'all think I should do with the inside of the drawers?
A. Leave it as just foam. Still looks good.
B. Cut in a fabric over the foam so it's smoother and sleeker.
I'm thinking about going with Purple
Here's a VERY ROUGH mock up. Keep in mind: the medals will be recessed(not sitting on top), the fabric will be smoothed to remove wrinkles before bonding, and the wood will be a dark stain when complete.
______________________________________________
Friday Oct. 14th
I got another cool job. I'm guest starring on NCIS, so I have been tied up again and my work has been slow.
That said, we're getting close to the finish line as far as construction goes. All the drawers are built and their pine faces have been added. I've decided to make a slightly larger drawer for the bottom(since my measurements were off), and I've got to set all the drawers for the top.
_________________________________________________
Thursday Nov. 10th
I've been delayed, AGAIN. but here is the status as of today:
I looked EVERYWHERE FOR 30 pieces of matching ANTIQUE hardware..... IMPOSSIBLE. And when I did find something, EXPENSIVE!
I settled on chinese knockoffs. at $21 for the 30 pieces. I'm.....content with them.....for now. I ordered 10 at first because at $7, I wanted to see what they looked like at an inexpensive price tag. That is why only 1/3 of the pulls are attached. I will remove the pulls before staining. I just wanted to have my holes drilled and see if I like the look of the pulls.
The drawers are all built and set finally!
-The final steps are:
-fine sand everything,
-vacuum/wipe down everything,
-stain interior and drawers first,
-stain cabinet and pine faces last,
-put hardware back on,
-upholster/foam in interior of drawers.
THEN FINISHED
______________________________________________________
Tuesday Nov. 15th
Things are starting to shape up, as its time to make some STAINS!
Here is a photo of the operation(I've already stained the cabinet here, but will wait to show you the whole thing in the reveal)
I used Pre wood conditioner, then Red Mahogany stain, and will follow up with wipe on poly once I have the desired color.
Here is AFTER the first staining pass on the LEFT and after the second pass on the RIGHT. I'll probably do a third coat on the drawer faces
This is after the pre wood conditioner on the LEFT and after 1 coat of stain on the RIGHT. This is my desired hue for the cabinet.
Now for INSIDE the drawers, I decided to start with the medals with ribbons first.
I have small plastic hinged boxes for the medals to reside in. This is for 2 reasons: 1 to contain an otherwise dangly(for lack of a better term) medal in a confined space, and 2, an extra layer of protection.
I will cut my 1/2 inch foam to fit the box and use their existing pins to hold them in place.
I haven't done it yet, I will cut the foam so that each box sits into it, NOT on top of it.
_____________________________________________________________
Tuesday December 6th
Here is the cabinet the last month waiting for me to get back to work on it.
about the photo below:
1. I hadn't finished matching my stain on the drawer faces to the cabinet color
2. this photo shows the different phases of work. drawers missing faces, Pine faces in and ready to be stained, and staining already in process.
AGAIN, The below photo is NOT how the cabinet is going to look (as it looks like crap here)
_______________________________________________
So you know,
The cabinet is FINISHED!....the drawers, are NOT. I will show the whole cabinet when finished with everything
_______________________________________________
Drawers:
First step, use wood conditioner, and 1-2 hours later I stained the insides and outside with Red Mahogany. Let it dry over night. Then did a second coat for desired color. The reason I DIDN'T stain the inside bottom, is because it would be wasteful, as it will be covered by fabric and foam....you'll see.
Then I stained the bottoms(underside). One coat is enough, as the bottom shouldn't be seen anyway.
*** I COMPLETELY FORGOT to photograph the next step, which was polyurethane. I chose to use Glossy for the drawers. I'm happy with the results as you'll see in the photos below. Remember that I used SATIN on the drawer faces and the cabinet exterior.
Now, to build the interior of the drawers.
There are 14 drawers. 4 on top, 9 on bottom, with a 10th on bottom that is twice as deep.
The top 2 will be for Pre-Official Inaugural Medals: Jefferson - Cleveland
The next 2 will be for Inaugural Committee badges Harrison - McKinley
The bottom 10 will be Official Inaugural Medals: Mckinley - Trump(should be an ...interesting medal)
I'll start with the Committee Badges:
I took a drawer, cut dense 1/2in foam to fit the bottom of the drawer. Placed my ribbon boxes exactly how I wanted them. Measured and re-measured to insure my OCD was satisfied. Then I used an X-acto knife to outline the bottom of each box cutting the foam away.
I then placed the boxes in their spots to make sure everything lined up and no changes had to be made.
Next step: Fabric
I bought some purple fabric (ala the Pan Pac set above) for the drawers. I lightly dusted the foam with craft adhesive and gently tapped so that everything bonded. Let it dry overnight.
Make a couple incisions with the X-acto blade and the ribbon box will slide right in.
Finished product:
Here it is IN ACTION:
https://www.youtube.com/watch?v=mCvjAay7IdE&feature=youtu.beNow I have 13 more drawers to foam/cut/fabric, and then I'll be ready to show you the final product.
SHOULD BE FUN.
V
V
V
V
V
V
V
V
V
V
V
V
V
V
--------UPDATE, Monday January 9th
FINISHED PRODUCT,
final expense total = $399
I'm quite happy!
Thanks for following my journey,
-Charlie
NOTE
*** I already had a saw, dremmel, straight edge, protective eyewear, drill, bits and some plywood.
Items bought so far:
Dresser - $80
Citristrip - $10
nails - $10
Screws - $10
Pine - $38
Sandpaper - $40
Plywood - $42
Foam - $24
Handles - $26
Stain - $30
Pre wood conditioner - $15
Poly - $30
rags - $4
gloves - $3
Foam adhesive - already owned
Purple cloth - $32
Label tag holders - $5
TOTAL amount spent to date = $399
How I pay the bills:
https://imdb.com/name/nm1835107/
https://imdb.com/name/nm1835107/
30
Comments
US Civil War coinage
Historical Medals
Collector since 1976. On the CU forums here since 2001.
Good luck
Not OT at all, in my opinion. I look forward to seeing the finished result.
Me also. My woodworking skills result in a small bonfire.
- Marcus Tullius Cicero, 106-43 BC
Have done tons of customized modifications.
So good for you! That cabinet is gonna love you back for years after you wrestle with it a couple of weeks.
Look forward to your progress reports.
Not OT at all, in my opinion. I look forward to seeing the finished result.
Me also. My woodworking skills result in a small bonfire.
Ditto. I doubt I could make a decent toothpick.
Collector since 1976. On the CU forums here since 2001.
https://imdb.com/name/nm1835107/
Fantastic. That's the word. One piece of advice for other copy cats. Depending on what you are storing be careful of the materials that you use since the out gassing does effect patina
Can't believe I forgot to mention this. THANK YOU! This is obviously extremely important.
I store all my medals in airtite holders. RC-350 is the size that can hold up to 76mm.
I plan to stain all the wood pieces and let them vent for a month or so before introducing the medals into their final resting spot.
https://imdb.com/name/nm1835107/
I think what you are doing is phenom, the only thing I would do differently is splurge for real wood instead of using plywood that contains formaldehyde and other glues and chemicals that could affect you, your family and your coins.
I wrestled with this for quite some time. Still not sure I made the right choice
https://imdb.com/name/nm1835107/
Not saying I don't have any cabinets that someone else who wanted to save money before me used but I now choose not to since becoming aware of the harmful effects and the possibilities it can do to metal and not saying it will. But for health concerns alone I would not use it. BTW please be aware I am over the top on many issues
I think what you are doing is phenom, the only thing I would do differently is splurge for real wood instead of using plywood that contains formaldehyde and other glues and chemicals that could affect you, your family and your coins.
I wrestled with this for quite some time. Still not sure I made the right choice
I have a feeling that you might just continue to build this one using the materials you're using, finish it as a prototype, sell it for a profit
(maybe to one of us
Excellent project no matter what
Liberty: Parent of Science & Industry
I think what you are doing is phenom, the only thing I would do differently is splurge for real wood instead of using plywood that contains formaldehyde and other glues and chemicals that could affect you, your family and your coins.
I wrestled with this for quite some time. Still not sure I made the right choice
I have a feeling that you might just continue to build this one using the materials you're using, finish it as a prototype, sell it for a profit
(maybe to one of us
Excellent project no matter what
....If I want to make any profit, I should stop posting what I've spent! HA!
Honestly, if I see another dresser that is cheap and has interesting bones, I might just pick it up and build another after this is done. The prices for architects cabinets or flat cabinets like this are $2500-$3600
My goal is to keep this at under $250
Thank you for your nice words of encouragement.
https://imdb.com/name/nm1835107/
M
Fellas, leave the tight pants to the ladies. If I can count the coins in your pockets you better use them to call a tailor. Stay thirsty my friends......
My wife almost passed out trying to strip a desk in the hot sun all day with nasty chemicals. The next day it was at a professional's house getting done the right way
Cool idea!
BST transactions: dbldie55, jayPem, 78saen, UltraHighRelief, nibanny, liefgold, FallGuy, lkeigwin, mbogoman, Sandman70gt, keets, joeykoins, ianrussell (@GC), EagleEye, ThePennyLady, GRANDAM, Ilikecolor, Gluggo, okiedude, Voyageur, LJenkins11, fastfreddie, ms70, pursuitofliberty, ZoidMeister,Coin Finder, GotTheBug, edwardjulio, Coinnmore, Nickpatton, Namvet69,...
"A dog breaks your heart only one time and that is when they pass on". Unknown
I like stability, I would nt put rollers on it.
Cool idea!
I agree. The casters would only be a benefit if placing on a hard surface and needing to move it frequently. I would opt for thick felt pads on the bottom of the legs. If the cabinet needs moving these allow it to slide nicely if on a wood floor.
Great project!
Great transactions with oih82w8, JasonGaming, Moose1913.
is it within your power to go a full 24 hour period without trying to be negative?? I remember when you used to post interesting stuff about Fuechtwangers and electro-copies you had made. lately, that's missing and the above type of posts seem to dominate.
just sayin........................
And an alternative approach is to seal the wood:
http://www.buildingforhealth.com/afmsafecoat_safeseal.html
"AFM Safecoat SafeSeal: A multi-use, water based, low gloss sealer for highly porous surfaces such as particle board, plywood, processed wood, and porous concrete. Used primarily to reduce toxic outgassing: in particular, it is highly effective at sealing in formaldehyde outgassing from processed wood such as plywood, particle board, and pressed wood. Safecoat Safe Seal is virtually odorless on application and odorless once cured. For interior use."
Hoard the keys.
Lets see the good side, though!
https://imdb.com/name/nm1835107/
My YouTube Channel
Cool project!
-~-~-~-~-~-~-~-~-~-~-~-~-~-~-~-~-~-~-~-~-~-~-~-~-~-~-~-~-~-~-~-~-~-~-~-~-~-~-~-~-~-~-~-~-~-~-~-~-~-~-~-~-
My sets: [280+ horse coins] :: [France Sowers] :: [Colorful world copper] :: [Beautiful world coins]
-~-~-~-~-~-~-~-~-~-~-~-~-~-~-~-~-~-~-~-~-~-~-~-~-~-~-~-~-~-~-~-~-~-~-~-~-~-~-~-~-~-~-~-~-~-~-~-~-~-~-~-~-
Collector since 1976. On the CU forums here since 2001.
My YouTube Channel
^^^^ HA!
Lets see the good side, though!
That was!!!
Hoard the keys.
If we were all the same, the world would be an incredibly boring place.
Tommy
Very cool indeed.
You asked for opinions about casters. Short opinion: I wouldn't. Thoughts behind my opinion:
1. Your piece promises to be a very nice and unique piece of furniture. As such, altering the profile (which I think it will - see green piece in OP) is not necessary.
2. I think casters are not attractive, and would take away from your unique approach to retrofitting this piece of furniture.
3. Casters tend to freeze-up, making the piece difficult to move.
4. Casters may make the piece wobbly, or less stable than the existing legs.
5. The thought that the cabinet is on wheels and therefore movable could lead to problems, either with the casters, or worst case with the legs themselves (imagine someone pushes the cabinet on carpet without consideration of the force it puts on the legs).
6. Leaving the legs as-is saves you the time, and potential frustration, of installing casters plumb and secure.
Food for thought.
Cool topic. Not OT. And I too look forward to your progress pics.
I think you're right on on all these points.
Thank you and thank others that weighed in on the casters. I'll pass on them for now.
I do have tile and hardwood floors in my house, so the cabinet could've be a dance partner if I ever needed one.
NO CASTERS IT IS.
https://imdb.com/name/nm1835107/
"A dog breaks your heart only one time and that is when they pass on". Unknown
Keeper of the VAM Catalog • Professional Coin Imaging • Prime Number Set • World Coins in Early America • British Trade Dollars • Variety Attribution
Latin American Collection
Dresser - $80
Citristrip - $10
nails - $5
Screws - $5
Pine - $38
Sandpaper - $40
Plywood - $21
TOTAL amount spent to date = $199
COOLNESS FACTOR : PRICELESS
Dresser - $80
Citristrip - $10
nails - $5
Screws - $5
Pine - $38
Sandpaper - $40
Plywood - $21
TOTAL amount spent to date = $199
COOLNESS FACTOR : PRICELESS
Thanks!!
It dawned on me after I did the first post that I really should keep a running tab of what I've spent to inspire others, since comparable pieces run 2-3k+
(Provided mine looks good when done)
https://imdb.com/name/nm1835107/
My YouTube Channel