How I take pictures
 ambro51
Posts: 14,080 ✭✭✭✭✭
ambro51
Posts: 14,080 ✭✭✭✭✭
Good Numismatic Photography is one of the best things you can learn to add to your enjoyment of your coins. In addition to letting you share your images on this forum, it lets you document your collection for insurance purposes, realize the greatest prices when you sell, and see things on the coin that your eye and loupe will often miss.
There are many paths in photography, and it is a constantly evolving process. Some of the basics though, NEVER change. When I learned wet plate photography, a process on glass plates invented in the 1850s, my mentor gave me one statement that holds true no matter how you image. You MUST see the image clearly on the ground glass, or today, the little screen on the back of your digital camera. A simple statement, but really, it is paramount.
Taking photos is nothing but painting with light. Understanding light is the most important thing a photographer can learn. Most make it a lifetime pursuit, and some master it, but many do not. Rembrandt mastered light. He understood that the source of the light, and the direction of the light created the image, whether it is an oil painting, or a digital photograph. Without light, there is no photograph.
KISS. We have all seen that phrase, and we all know what it means. Keep It Simple Stupid. It is so easy to get overwhelmed with many aspects of working your camera, an indeed, it is better just to throw in the towel these days and get a simple camera that does the thinking for you. I found such a camera. It answers all my needs, from shooting video of a snowstorm to doing macro coin photography. This is the Kodak Z712IS. This is a digital slr, inexpensive, tough and easy to use. Kodak easy share software is user friendly and free. Couple that software with Photoscape... and you can do a whole lot of things with your images.
The Z712IS does have one drawback though, and one we must correct for coin photography. It will NOT focus as close as we need. So, what I do, and what can be done with a macro lens...is to add a lens to the front of my lens. This is a bit of rigging here for sure, but it is inexpensive and works wonderful. Surplusshed is a company which offers zillions of little goodies, including a great assortment of lenses. The one I use is this one. http://www.surplusshed.com/pages/item/l3712.html
I tape this onto the front of my camera lens, with blue painters tape, with the new lens facing outward, toward the coin. This lets you work close in, and coupled with the cameras focal range lets you do anything from whole coin images, to extremely close macro work. For nine dollars, you simply cannot beat what this little lens can do for you images. Couple this with the zoom feature on the camera, and you have a great tool to work with. It can create a circular image when the camera is used on wide angle, but for closer work, the image fully fills the view screen. Since we are going to crop out with photoscape, it matters not what is outside of the coin area.
The camera has several settings. Use FLOWER. With the autofocus, and the add on lens mentioned above, most of your photography will have the camera about 8 inches above the coin. Getting the camera in this close restricts depth of field to a very narrow distance...and we WANT that. Those pesky slab scratches, for the most part will simply dissapear. The big gouges though will still need to be polished out (more on that later). But the little stuff, will simply not be seen. You NEED a copy stand if you are going to do a lot of coin imaging. This can be home made, as well as store bought. All this thing does is holds your camera firmly and square on with the coin. I use an old enlarger stand, with the enlarging head removed. The brace for the head has been drilled out and a wooden plate attached with a 1/4 20 adjustable screw installed, which is what holds the camera. This is a firm enough mounting that the simple pressure of your finger on the shutter release will not move the camera to blur the image. When you compose the image, zoom in enough to let the coin nearly fill the viewing screen, but make a margin top and bottom so that when you work the image you are well within the image frame.
Lighting. Wow, Ive seen so many options offered on this forum....the way I do it is just so simple, and it works. In my shop, Ive got a four tube flourescent fixture up on the ceiling. Thats my light source. Remember Rembrandt? He discovered that light should come in from a slight angle, not straight on. So, that light fixture is on what Id call a 10 oclock angle from the coin, This pours the light onto the face of the portrait, rather than the back of the head. We should treat our coin portrait busts the same as if we had a real sitter for a portrait. Angled light is the way to do this. Back to seeing the image on the screen, now you need to look at your view screen intently. (put your reading glasses on) The copy stand/camera/coin assembly can be tilted and moved about as you view the image on the screen. Youll see how the light work, the reflections, the contrasts...all will change as you move the stand about under the light. Shoot a bunch of images. Its not like good ol 35 mm....it dosent cost anything so take a lot of pictures, and choose the best after youve downloaded your images. There will be a few that just get it all right. The contrasts and light angles will all work to give you a real, high quality lifelike image.
Toned, and colorful coins, will require careful viewing on the screen to be positioned to get the colors you want to see. Trouble is, the slab plastic will catch this optimum lighting from overhead at exactly the same plane as when the coin shows its best colors (thats why tru view images from PCGS look so great,,,no plastic). But, this is something we have to live with. The limited depth of field with the macro lens will still let you tilt your coin a few degrees...but make it very slight. Slab scratches should be polished off. While they will not show up with my method, they do decrease contrasts and the worst will look like white fuzz. I use Slab Renew, a high quality product designed for what we are doing. Buff using a soft clean cloth, an old T shirt works great, buff in one direction only, since hairline scratches will still be on the slab, keep the buff in the up and down direction and your hairlines wont be visible.
After you download your images.....really study them. After you find the ones you like, open Photoscape and move the image to editor. When this comes up, you can crop circular, and install a black background. This program also offers options to let sharpen, or add contrasts....but Ive found that if you get it right RAW, then you dont need to do this. Then, resize the image. For two across viewing on this forum, 500X500 works great. If you really want large size, and an up and down presentation here, use 800X800. Photoscape will also let you do subtle rotation of your image, since a lot of times the angle of your original coin image is off a tad. After you resize your image, and file it, you can go into your main computer pictures folder and open that which will let you "FIX", which gives you control over brighness, saturation and contrast. Usually, I find it more lifelike to the coin to tinker with these just a wee bit. Everything seems to look a little better with a small bit of contrast added.
Photobucket gives the means to get your images up on this forum. Id suggest though, having ONE seperate account where you ONLY keep coin images, not your house, car, kids etc....as security is very important. Any image you post will link your entire photobucket account to the image and hence let the world see whatever else is in that album.
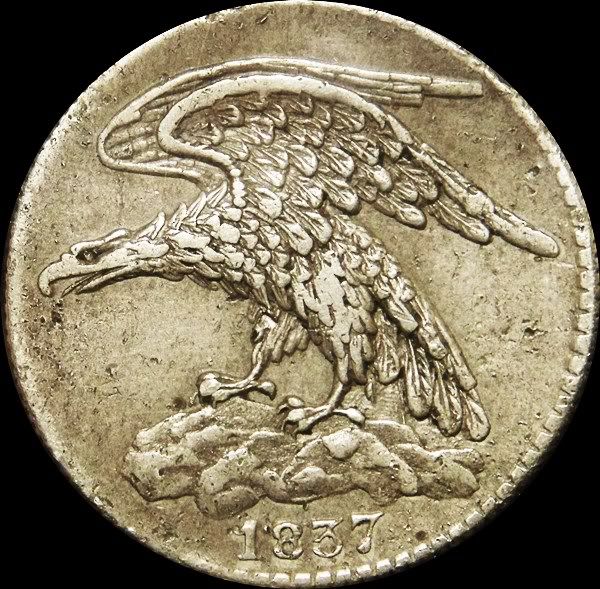
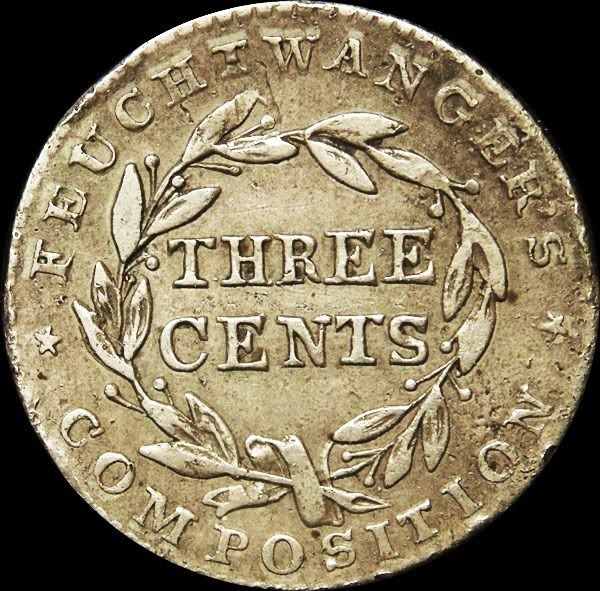
Hope this helps. I know no doubt others have differing views on many of the things Ive written...and thats OK. But as long as Im getting images like this Im happy with the path Ive taken and hope others can learn a little from what Ive written.
There are many paths in photography, and it is a constantly evolving process. Some of the basics though, NEVER change. When I learned wet plate photography, a process on glass plates invented in the 1850s, my mentor gave me one statement that holds true no matter how you image. You MUST see the image clearly on the ground glass, or today, the little screen on the back of your digital camera. A simple statement, but really, it is paramount.
Taking photos is nothing but painting with light. Understanding light is the most important thing a photographer can learn. Most make it a lifetime pursuit, and some master it, but many do not. Rembrandt mastered light. He understood that the source of the light, and the direction of the light created the image, whether it is an oil painting, or a digital photograph. Without light, there is no photograph.
KISS. We have all seen that phrase, and we all know what it means. Keep It Simple Stupid. It is so easy to get overwhelmed with many aspects of working your camera, an indeed, it is better just to throw in the towel these days and get a simple camera that does the thinking for you. I found such a camera. It answers all my needs, from shooting video of a snowstorm to doing macro coin photography. This is the Kodak Z712IS. This is a digital slr, inexpensive, tough and easy to use. Kodak easy share software is user friendly and free. Couple that software with Photoscape... and you can do a whole lot of things with your images.
The Z712IS does have one drawback though, and one we must correct for coin photography. It will NOT focus as close as we need. So, what I do, and what can be done with a macro lens...is to add a lens to the front of my lens. This is a bit of rigging here for sure, but it is inexpensive and works wonderful. Surplusshed is a company which offers zillions of little goodies, including a great assortment of lenses. The one I use is this one. http://www.surplusshed.com/pages/item/l3712.html
I tape this onto the front of my camera lens, with blue painters tape, with the new lens facing outward, toward the coin. This lets you work close in, and coupled with the cameras focal range lets you do anything from whole coin images, to extremely close macro work. For nine dollars, you simply cannot beat what this little lens can do for you images. Couple this with the zoom feature on the camera, and you have a great tool to work with. It can create a circular image when the camera is used on wide angle, but for closer work, the image fully fills the view screen. Since we are going to crop out with photoscape, it matters not what is outside of the coin area.
The camera has several settings. Use FLOWER. With the autofocus, and the add on lens mentioned above, most of your photography will have the camera about 8 inches above the coin. Getting the camera in this close restricts depth of field to a very narrow distance...and we WANT that. Those pesky slab scratches, for the most part will simply dissapear. The big gouges though will still need to be polished out (more on that later). But the little stuff, will simply not be seen. You NEED a copy stand if you are going to do a lot of coin imaging. This can be home made, as well as store bought. All this thing does is holds your camera firmly and square on with the coin. I use an old enlarger stand, with the enlarging head removed. The brace for the head has been drilled out and a wooden plate attached with a 1/4 20 adjustable screw installed, which is what holds the camera. This is a firm enough mounting that the simple pressure of your finger on the shutter release will not move the camera to blur the image. When you compose the image, zoom in enough to let the coin nearly fill the viewing screen, but make a margin top and bottom so that when you work the image you are well within the image frame.
Lighting. Wow, Ive seen so many options offered on this forum....the way I do it is just so simple, and it works. In my shop, Ive got a four tube flourescent fixture up on the ceiling. Thats my light source. Remember Rembrandt? He discovered that light should come in from a slight angle, not straight on. So, that light fixture is on what Id call a 10 oclock angle from the coin, This pours the light onto the face of the portrait, rather than the back of the head. We should treat our coin portrait busts the same as if we had a real sitter for a portrait. Angled light is the way to do this. Back to seeing the image on the screen, now you need to look at your view screen intently. (put your reading glasses on) The copy stand/camera/coin assembly can be tilted and moved about as you view the image on the screen. Youll see how the light work, the reflections, the contrasts...all will change as you move the stand about under the light. Shoot a bunch of images. Its not like good ol 35 mm....it dosent cost anything so take a lot of pictures, and choose the best after youve downloaded your images. There will be a few that just get it all right. The contrasts and light angles will all work to give you a real, high quality lifelike image.
Toned, and colorful coins, will require careful viewing on the screen to be positioned to get the colors you want to see. Trouble is, the slab plastic will catch this optimum lighting from overhead at exactly the same plane as when the coin shows its best colors (thats why tru view images from PCGS look so great,,,no plastic). But, this is something we have to live with. The limited depth of field with the macro lens will still let you tilt your coin a few degrees...but make it very slight. Slab scratches should be polished off. While they will not show up with my method, they do decrease contrasts and the worst will look like white fuzz. I use Slab Renew, a high quality product designed for what we are doing. Buff using a soft clean cloth, an old T shirt works great, buff in one direction only, since hairline scratches will still be on the slab, keep the buff in the up and down direction and your hairlines wont be visible.
After you download your images.....really study them. After you find the ones you like, open Photoscape and move the image to editor. When this comes up, you can crop circular, and install a black background. This program also offers options to let sharpen, or add contrasts....but Ive found that if you get it right RAW, then you dont need to do this. Then, resize the image. For two across viewing on this forum, 500X500 works great. If you really want large size, and an up and down presentation here, use 800X800. Photoscape will also let you do subtle rotation of your image, since a lot of times the angle of your original coin image is off a tad. After you resize your image, and file it, you can go into your main computer pictures folder and open that which will let you "FIX", which gives you control over brighness, saturation and contrast. Usually, I find it more lifelike to the coin to tinker with these just a wee bit. Everything seems to look a little better with a small bit of contrast added.
Photobucket gives the means to get your images up on this forum. Id suggest though, having ONE seperate account where you ONLY keep coin images, not your house, car, kids etc....as security is very important. Any image you post will link your entire photobucket account to the image and hence let the world see whatever else is in that album.
Hope this helps. I know no doubt others have differing views on many of the things Ive written...and thats OK. But as long as Im getting images like this Im happy with the path Ive taken and hope others can learn a little from what Ive written.
1
Comments