Options
Photographing proof coins with color
 OriginalDan
Posts: 3,735 ✭✭✭✭✭
OriginalDan
Posts: 3,735 ✭✭✭✭✭
I'm calling on some of you photo experts for some help here. I'm on a quest to shoot really dynamite coin photos and I've run up against a roadblock trying to shoot this proof trade dollar. It's a fantastic coin and I'd love to nail the color. Here's where I'm at right now:
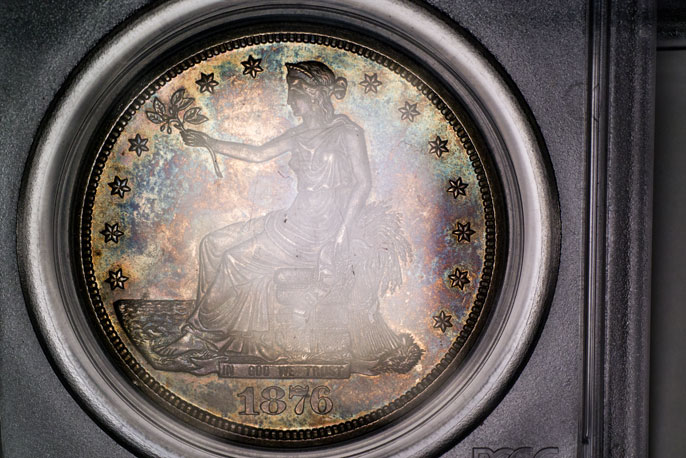
(please ignore the slab defects, I'll polish those out later)
My setup:
I'm shooting with a 90mm equivalent macro lens, a single diffused light source perpendicular to a slab which is tilted slightly with respect to the lens. The single diffused light is a Jansjo LED light, diffused with double ply diffusor paper. The light works great for regular coin photos.
As you can see, the issue I'm having is with the light source reflecting off of the face of the slab. Should I...
1. Move the camera higher, allowing me to back of the light source so that it covers more than the size of the coin, allowing me to play with the overall contrast of the coin and "contrast out" the glare?
2. Use a better/different light source?
3. ???
Would love to hear your thoughts on how to improve my shots of proof coins with color. Thanks in advance.
Edit: Yes, I have Mark's book and apparently I need some independent tutoring
0
Comments
PCGS Registries
Box of 20
SeaEagleCoins: 11/14/54-4/5/12. Miss you Larry!
Here's another example of a proof-like reverse. I feel like it's almost there, I think my next step will be to back off the camera and light distance a bit and check the slab/light angle.
PCGS Registries
Box of 20
SeaEagleCoins: 11/14/54-4/5/12. Miss you Larry!
axial light will only work on a raw coin.
The coin will look butt ugly in other words.
Edit: And maybe I'm misinterpreting your response, but was your comment on not diffusing the light in reply to the original post? Mind explaining how not diffusing the light will improve this particular scenario? It's a process for me, that I'm working through, but any tips you can offer are greatly appreciated.
As a general rule lights positioned at 45 degrees to the side (classic copy lighting) will eliminate the reflections.
Contrast adjustments aren't going to help you here. Ou must work with the light positions relative to the reflective surface of the slab. Move them off to the side so the reflection bounces away from what the lens is seeing. The angle of reflectance is equal to the angle of incidence. In other words, if your light were to be truely axial and coming down from the lens, then it would be reflecting straight back into the lens. Unless some of the angles are adjusted, axial lighting is going to be very challenging with that slab.
It looks like you're on the correct path though and you said it yourself in that you're going to have to experiment some more with the adjustments.
You can use diffuse light without it being axial. Try moving the lights off to the ide and placing some diffusing medium between the lights and the coin.
Just speaking from my experience here. Though i have a great deal of photographic experience, my coin photography expertise is much less than many on here and I'm still learning all the time. That's one of the things that makes this such a great place- all the sharing.
Happy, humble, honored and proud recipient of the “You Suck” award 10/22/2014
I do understand the theory of using the angles to avoid the slab glare. My struggle has been to reflect the light off of the coin in an attractive way, without also reflecting the light off of the slab. Time for more experimentation and practice.
<< <i>THX Dan, so what grade yah give her? >>
Definitely not a series I'm familiar with, but I'll take a SWAG and say 64 or 58 if there's rub.
<< <i>Try adding a second light and moving the reflection points off the coin itself and to an area just outside the coin. That way the mirrors will "light up" but not cause the loss of contrast from reflection off the slab as shown in your first photo. Good luck...Mike >>
This method has worked great for me on normal, not proof coins or coins without as much color. But I can't get the color to pop with this method, I think it's because my lights are not close enough to the lens. In order to fix this, I'm going to try to move the lens further from the coin which will bring the lights closer and make the angle of incidence that much smaller. Will experiment this weekend.
Whether you need to move the camera higher depends on whether you need more room to get the lights where you want them. A 90mm-equivalent lens (I assume this means a 60mm lens on an APS-C camera) gives less working distance than I'd like.
I've never had any luck mixing axial lighting and slabs and getting better pictures than I can get with non-axial lighting.
Keeper of the VAM Catalog • Professional Coin Imaging • Prime Number Set • World Coins in Early America • British Trade Dollars • Variety Attribution
Close btw, I'm using a the 45mm Panny/Leica on a MFT body. Fantastic little setup. I have access to a Canon APS-C body with 100mm macro which should allow a lot more room to play with the lights.
Edit: yes the slabs will be polished! I figure there's no point until I get the lighting right though!
-Paul
<< <i>Axial lighting. It's a pain in the you-know-what though. Here's the same coin straight on and again ligthed axially. >>
Did you use a polarizer filter on your lens to cut the haze/glare that is produced when using axial lighting while shooting through a slab?
Keeper of the VAM Catalog • Professional Coin Imaging • Prime Number Set • World Coins in Early America • British Trade Dollars • Variety Attribution
<< <i>Since you are already using diffusion on the LED, try varying the distance of the diffusion from the light. moving the diffusion closer to the coin should help make the light spot larger. LEDs are normally a point source and that will make it harder all around than a larger light such as a typical lightbulb. >>
Thanks Mark, I kind of figured I was limiting myself with the LED. I'll also try the trick with the diffusion distance to light source.
<< <i>Axial lighting. It's a pain in the you-know-what though. Here's the same coin straight on and again ligthed axially. >>
Very impressive Paul, I was not as successful as you. Nice coin and I'm glad you were able to bring out that great color.
Although my photo experience is limited to raw coins, I am finding the same issues as you have. What I notice is that the size of the coin matters a bit with the type of light source in conjunction to distance makes shooting so dynamic. Your coin is large, it appears the light is more intense at the center and does not cover the entire coin in an evenly lumen distribution. Flood lights distribute a larger area of light and spot lights are more concentrated. I just switched to an L.E.D. style bulb with 680 lumens but have found other lights at the same output have different outside diameters of measure. I went to my local light store and tried out some lights, but now I am thinking about taking my light set-up over there and try them out in "my" copy stand. I like the idea of pulling back the light a bit to evenly cover the coin (if possible without losing color) possibly using a diffuser from a tupperware lid and then adjust "render" in Photoshop but it takes sooooo much time-probably because I do not know what I am doing. The lid needs to be moved further away from the bulb to obtain a even distribution but you have to play around with this. Again, I am a novice at this myself so if you find better answers please share.
Enjoyed numismatic conversations with Eric P. Newman, Dave Akers, Jules Reiver, David Davis, Russ Logan, John McCloskey, Kirk Gorman, W. David Perkins...
http://macrocoins.com
<< <i>
<< <i>Axial lighting. It's a pain in the you-know-what though. Here's the same coin straight on and again ligthed axially. >>
Did you use a polarizer filter on your lens to cut the haze/glare that is produced when using axial lighting while shooting through a slab? >>
Polarizers won't help. The glare is directly-reflecting off the slab surface. Polarizers only work when the reflection is at an oblique angle...Ray
http://macrocoins.com
<< <i>
<< <i>Axial lighting. It's a pain in the you-know-what though. Here's the same coin straight on and again ligthed axially. >>
Very impressive Paul, I was not as successful as you. Nice coin and I'm glad you were able to bring out that great color. >>
Thanks! Keep trying, it takes a bit to get the hang of it!
-Paul
I moved the light source higher and closer to the lens, and moved the diffusion away from the light, closer to the coin. I'm still not happy, it's a bit flat and the luster is totally washed. At least I've mostly eliminated the slab glare. The process continues...
Next step is to bring out the halogen's and copy stand setup. I'll have more adjustability and the lights should be much easier to deal with.