Brand New Photo Setup! Check out my first pics and tell me what you think! (Lots of pictures of coo
Not too long ago, I realized I really needed a copy stand... as much as I love my little tripod, a copy stand simply is a better piece of equipment for keeping a camera steady and head-on a coin. So I finally found the stand I'd get with the help of K6AZ, a Testrite CS-2, which sells at B&H for about $75 shipped. I found one on eBay on Wednesday, got the shipping cost on Thursday, and hit BIN. It arrived at my door on Friday, less than 24 hours after I called in my CC number... that's unbelieveable for UPS ground (200 miles)! I got it for $55 shipped 
In addition to the copy stand, I also switched lights--I decided it was time to try out those Sylvania bulbs everyone was talking about. Since there are no Loews' near me, I went to one near my house in Baltimore, and bought 4 of every kind... they said I could return what I didn't like within 90 days, so now I've got some playing time I bought the Par 20s, Par 30s, and the regular Daylight floods. While I like the brightness of the Par 30s, the weight may be an issue, in that they do keep my lamps from going as high as I'd like. I'll play with that. The Par 20s were nice, but they aren't as wide as the bulbs I'm used to. I actually really liked the regular floods, which are light, and still bring out the color very accurately. Most of the pictures here are with the regular daylight floods.
Since the baseboard of the copy stand was 18% grey, I decided to meter on it... what a difference! The silver looks much more silvery now... glad I decided to do that I've also found that getting a coin's shot straight on is much, much easier with the added height and steadiness of the camera. Here are the pros and cons after having my stand assembled for under a day:
Pro:
Straighter shots
Easier to move lights while keeping the camera steady
Higher quality, sharper shots
Lots of playing time meant lots of CDs played... The Beatles and Abba
Cons:
Trying to use 4 lights can get crowded, and a light can't go behind the camera because of the stand's pole
Diffusing light is harder--camera needs to be angled, and the coin moved away from the camera (overall, this still worked out quite well, as my camera's lens swivels)... this is more noticeable in pictures of smaller coins, though, as the camera needs to be closer to them
Camera can't get as close to the base as I'd need for a large shot of small coins--remedied by taking a box, and putting a felt coin pad on it to make a shooting surface.
LCD faces the ceiling. I can't sit down on the floor like I used to when taking pictures
Two final things I tried: The angled glass (on the proof IHC). As you'll see, I only got the light in a small area of the glass, and it still had an extra-bright spot in the center. I'll either keep playing, or just give up on the technique. Also, the lampshade for DCAM coins. I like it!
Anyway, here are the pictures I promised! I took most of these shots today... I learned enough yesterday and today that most of what I took yesterday can already be greatly improved.
If you want to see a large (not resized after cropping, and less compressed) version of any picture, go to the image properties, and change the folder name before the file name to large instead of small
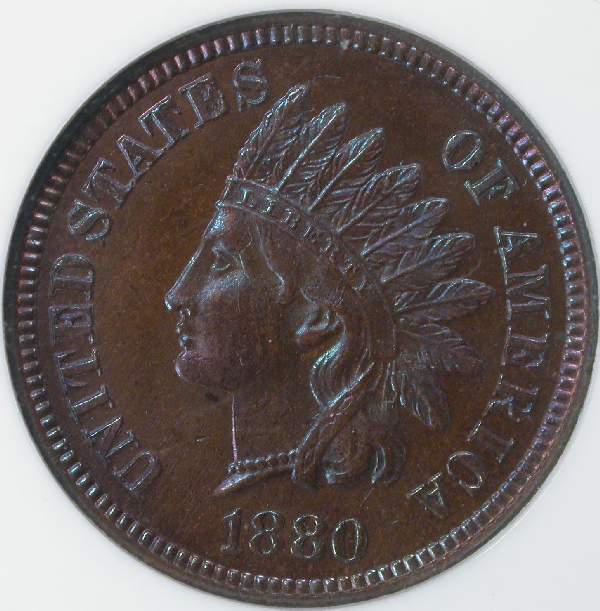
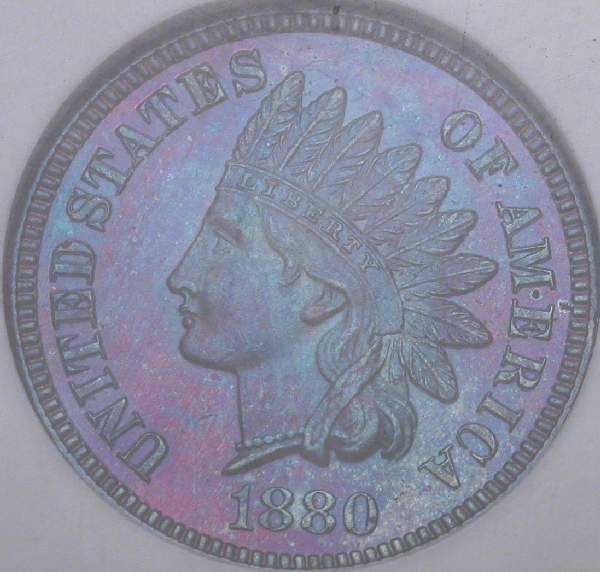
1880 NGC PF64BN... that should be Blue
Plain light, just so the coin could be seen:


Diffused light to show toning:


Angled Glass:


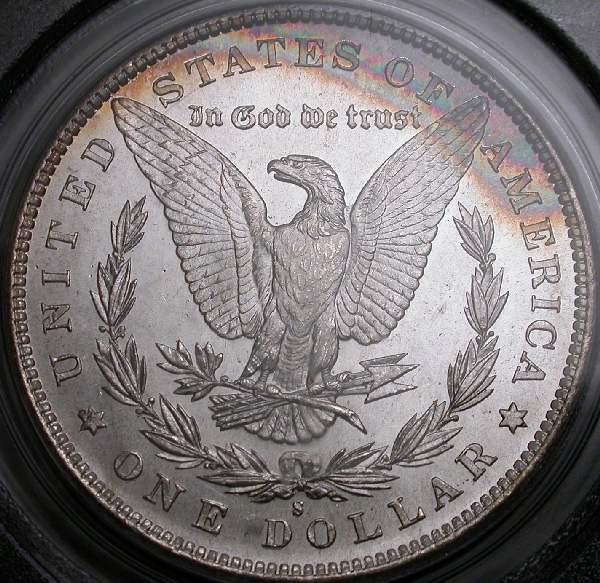
1880-S PCGS MS66 Toned Dollar (reverse, near the tail, is scratched on the slab, hence the blur)
Regular daylight floods, Diffused, Mix of Par 20s and Par 30s:


Regular daylight floods, diffused:


1885 PCGS MS64 Dime (all shots with regular daylight floods; blur on the obverse is from the slab)


1939 PCGS PR66 "Tiger-striped" Dime (reverse shot with PAR 20/30 bulbs)


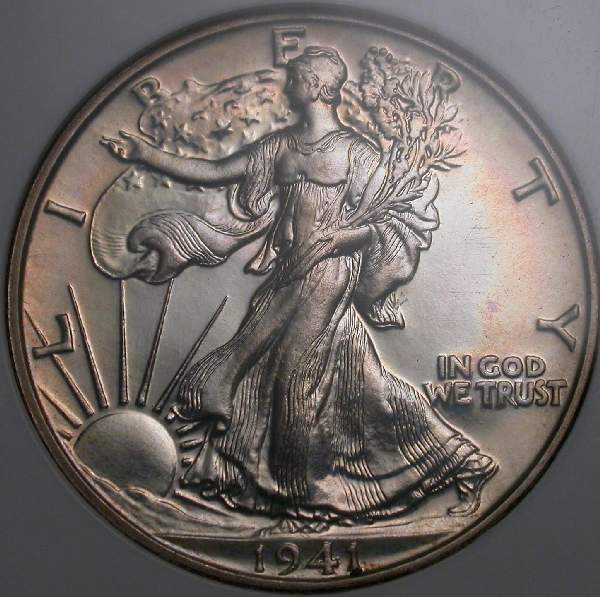
1941 NGC PF65 Half Dollar (diffused light--obverse photos show where the coin was placed--the first wasn't fully under the diffused light)


To make any of the following pictures larger, change the file name from _sm.jpg to _lg.jpg
2001-S PCGS PR69DCAM 10c (really dirty slab--been sitting on my desk for well over a year collecting dust)--lamp shade


Finally, a few comparisons of my old shots, and new ones, of the same coin :
1886 NGC MS62 S$1 (the old shots required diffused lighting for a separate toned shot; the new setup doesn't require me to do so)
OLD:


NEW:


1886 PCGS MS64 S$1
OLD:

NEW:

Ok! Let me have the good, the bad, and the ugly! I'd really like to know what you think!
Thanks,
Jeremy
In addition to the copy stand, I also switched lights--I decided it was time to try out those Sylvania bulbs everyone was talking about. Since there are no Loews' near me, I went to one near my house in Baltimore, and bought 4 of every kind... they said I could return what I didn't like within 90 days, so now I've got some playing time
Since the baseboard of the copy stand was 18% grey, I decided to meter on it... what a difference! The silver looks much more silvery now... glad I decided to do that
Pro:
Straighter shots
Easier to move lights while keeping the camera steady
Higher quality, sharper shots
Lots of playing time meant lots of CDs played... The Beatles and Abba

Cons:
Trying to use 4 lights can get crowded, and a light can't go behind the camera because of the stand's pole
Diffusing light is harder--camera needs to be angled, and the coin moved away from the camera (overall, this still worked out quite well, as my camera's lens swivels)... this is more noticeable in pictures of smaller coins, though, as the camera needs to be closer to them
Camera can't get as close to the base as I'd need for a large shot of small coins--remedied by taking a box, and putting a felt coin pad on it to make a shooting surface.
LCD faces the ceiling. I can't sit down on the floor like I used to when taking pictures
Two final things I tried: The angled glass (on the proof IHC). As you'll see, I only got the light in a small area of the glass, and it still had an extra-bright spot in the center. I'll either keep playing, or just give up on the technique. Also, the lampshade for DCAM coins. I like it!
Anyway, here are the pictures I promised! I took most of these shots today... I learned enough yesterday and today that most of what I took yesterday can already be greatly improved.
If you want to see a large (not resized after cropping, and less compressed) version of any picture, go to the image properties, and change the folder name before the file name to large instead of small
1880 NGC PF64BN... that should be Blue
Plain light, just so the coin could be seen:


Diffused light to show toning:


Angled Glass:


1880-S PCGS MS66 Toned Dollar (reverse, near the tail, is scratched on the slab, hence the blur)
Regular daylight floods, Diffused, Mix of Par 20s and Par 30s:


Regular daylight floods, diffused:


1885 PCGS MS64 Dime (all shots with regular daylight floods; blur on the obverse is from the slab)


1939 PCGS PR66 "Tiger-striped" Dime (reverse shot with PAR 20/30 bulbs)


1941 NGC PF65 Half Dollar (diffused light--obverse photos show where the coin was placed--the first wasn't fully under the diffused light)


To make any of the following pictures larger, change the file name from _sm.jpg to _lg.jpg
2001-S PCGS PR69DCAM 10c (really dirty slab--been sitting on my desk for well over a year collecting dust)--lamp shade


Finally, a few comparisons of my old shots, and new ones, of the same coin :
1886 NGC MS62 S$1 (the old shots required diffused lighting for a separate toned shot; the new setup doesn't require me to do so)
OLD:


NEW:


1886 PCGS MS64 S$1
OLD:

NEW:

Ok! Let me have the good, the bad, and the ugly! I'd really like to know what you think!
Thanks,
Jeremy
JK Coin Photography - eBay Consignments | High Quality Photos | LOW Prices | 20% of Consignment Proceeds Go to Pancreatic Cancer Research
0
Comments
What kinda camera ??
Herb
The camera is a Nikon Coolpix 4500. It, and the lamps (and the desk and outlets
I'll keep playing and see what happens... maybe I'll just stick with the sissy, light-weight bulbs
By that do you mean the lights basically over the coin, but as high above the coin as possible?
Now, the topper would have been if you could have shown us your new 1795 ANACS VG10 Flowing Hair dollar. . .
peacockcoins
i like the middle of the indian cent photo of the three the best
With the angled glass technique move the coin out of the glare spot and put a piece of black paper in front of the glass opposite the light.
09/07/2006