Home U.S. Coin Forum
Options

FAQ 2: Posting pictures to the forum

nwcsnwcs Posts: 13,387 ✭✭✭
Since it comes up now and then, I thought I'd give a pictorial guide.

Step 1: Create a new topic or post

Step 2: Type your message

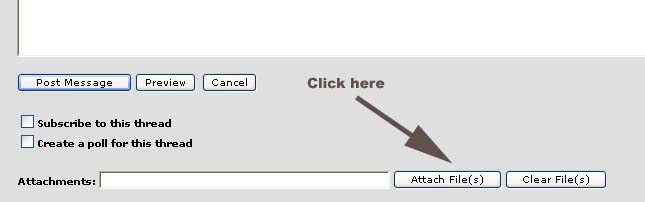
Step 3: Click the attach files button
image

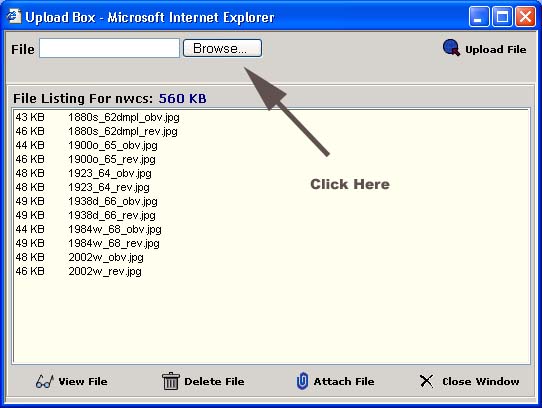
Step 4: Click Browse button to pick a file on your local system. The file must be less than 50K in size.
image

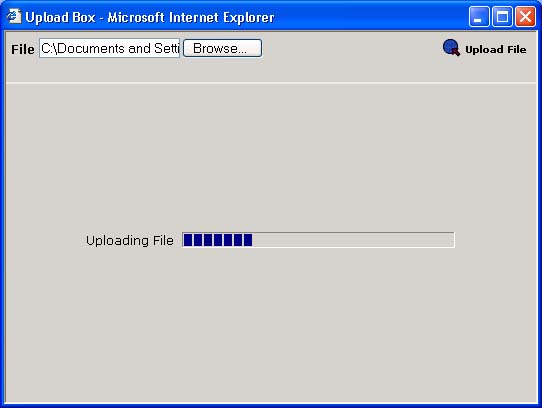
Step 5: You'll see this screen as it uploads
image

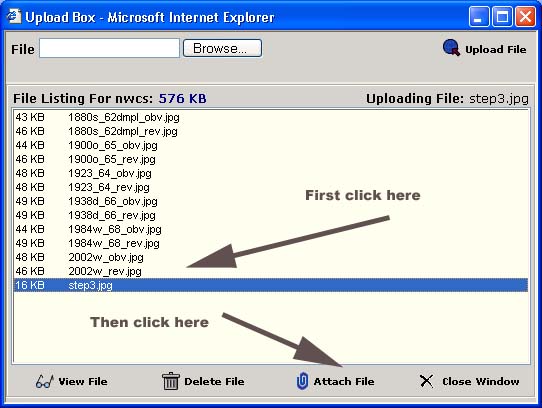
Step 6: Select the file in the list and then click attach
image

After you have done this, you are finished attaching a file to the post!

Comments

  • Options
    shylockshylock Posts: 4,288 ✭✭✭
    NWCS - that's very cool! I can tell you've done this before.
  • Options
    Man, I wish you had done that a week ago.
  • Options
    nwcsnwcs Posts: 13,387 ✭✭✭
    I figured it would help people (especially all the new people) to see the steps for posting an image. And if it can help people to post pics of coins, all the better!
  • Options
    nwcs, As a former teacher I'd like to say...

    you

    are

    very

    cool!
  • Options
    nwcsnwcs Posts: 13,387 ✭✭✭
    Thanks, Ursa. image My brother is a middle school teacher in a magnet school right now. I guess you can say I learned how to communicate by listening to him.
  • Options
    robertprrobertpr Posts: 6,862 ✭✭✭
    Finally, after completing the above steps, you may wish to include the picture directly inside your post as well. To do this, click inside the area where you type your message and then press image <- this button. A box will pop up asking for the URL of the image. Type https://us.v-cdn.net/6027503/uploads/oldattachments/ with the name of your file at the end.

    For instance, in the above example, the author had uploaded a file named 1984w_68_obv.jpg. To include that picture inside the message you would type https://us.v-cdn.net/6027503/uploads/oldattachments/1984w_68_obv.jpg in the box.

    Note that this puts the picture at the end of your message. To move it, highlight the information it has added to your message, choose cut from the edit menu, move the cursor to where you want the image to appear within your message, and choose paste from the edit menu.

    Also note that once the file is uploaded (step 5) you do not have to click the attach file button as shown in step six in order to include the image within your message, if you do not want to attach the image.
  • Options
    nwcsnwcs Posts: 13,387 ✭✭✭
    TTT because someone asked how to post pictures
  • Options
    jomjom Posts: 3,390 ✭✭✭✭✭
    This makes me wonder: Do you guys like it if the picture is posted in the message box OR as an attachment at the bottom??

    I've been putting it in the message box because that is how I like it when I view other peoples post. Then again, many people have slow internet so maybe the attach is better...

    jom
  • Options
    nwcsnwcs Posts: 13,387 ✭✭✭
    For me it depends on what I'm trying to do with an image. Most of the time I'm happy with links. In large image threads (where lots of pics are posted) I prefer links. But if I'm making a point or example I like it inline.
  • Options
    nwcsnwcs Posts: 13,387 ✭✭✭
  • Options
    mbbikermbbiker Posts: 2,873
    very nice post, i prefer to see the pictures in the post becasue i'm to lazy to open new windows to look at pics.
  • Options
    Thank you kind sir!image
    Roy


    image
  • Options


    << <i>i prefer to see the pictures in the post becasue i'm to lazy to open new windows to look at pics. >>


    With a dial-up I also worry about loading time for a picture link.image
    Roy


    image
  • Options
    NoGvmntNoGvmnt Posts: 1,126
    Ah, but how do you get it to consistently come up as your signature without having to "attach file" every time?
    Thanks, Jim
  • Options
    BaleyBaley Posts: 22,658 ✭✭✭✭✭
    well, lets give it a try:

    image

    is there a picture there?

    Liberty: Parent of Science & Industry

  • Options
    nwcsnwcs Posts: 13,387 ✭✭✭
    Yep!
  • Options
    BaleyBaley Posts: 22,658 ✭✭✭✭✭

    image


    Liberty: Parent of Science & Industry

  • Options
    BaleyBaley Posts: 22,658 ✭✭✭✭✭
    hmmm.

    image

    Liberty: Parent of Science & Industry

  • Options
    BaleyBaley Posts: 22,658 ✭✭✭✭✭
    ok, please, how do you get a pic in the signature line?

    Liberty: Parent of Science & Industry

  • Options
    LanLordLanLord Posts: 11,681 ✭✭✭✭✭
    It's not a coin, but it's San Francisco so there is a mint there somewhere
    image
  • Options
    FlashFlash Posts: 1,090 ✭✭✭
    When I try attaching a picture, 9 times out of 10 I get a message that my file is too large (needs to 50kb max) and, since I have no idea how to resize a picture, I give up.
    Matt
  • Options
    nwcsnwcs Posts: 13,387 ✭✭✭
  • Options
    TONEDDOLLARSTONEDDOLLARS Posts: 2,928 ✭✭✭✭
    Thanks for the info.image
  • Options
    nwcsnwcs Posts: 13,387 ✭✭✭
    ttt again
  • Options
    AskariAskari Posts: 3,713
    Great job!!imageimage Thanks NWCS!! image
    Askari


    Come on over ... to The Dark Side! image
  • Options
    lclugzalclugza Posts: 568 ✭✭
    Including an image in the signature line: This is done exactly the same way as putting an image in your post except that instead of clicking on "Reply," you instead click on "Profile" near the top of the page. Then when you reach the profile page, you go to the "Signature" box near the bottom.Then you type in [lMG] (URL of the picture) [/lMG], just as you would for putting a picture in a post. (I actually typed LMG, with a small L, to prevent the software from attempting to show a picture instead of showing my text; to make it work you must type IMG (I don't think the case matters) as in IMaGe.)
    image"Darkside" gold
  • Options
    It should be noted that when you hit "PREVIEW" button, the pic(s) do not show up...just the text & links. That was very annoying to me. I did not want post w/o pix & was not totally sure they would appear in my post. Then I just posted the message & pics appeared. Woo hoo!!! Also, if plan to post many pix, get good camera. I only have scanner & pics look poop! The bright, white reflective fields look dark & dingy.
    98PANDA.98panda
  • Options
    nwcsnwcs Posts: 13,387 ✭✭✭
    ttt for the recent newbies
  • Options
    nwcsnwcs Posts: 13,387 ✭✭✭
  • Options
    lordmarcovanlordmarcovan Posts: 43,218 ✭✭✭✭✭
    TTT

    Great job, nwcs.

    It's really nice to have a pictorial guide to show somebody, instead of having to go through a lengthy, belabored, and often confusing explanation, each and every time.

    Explore collections of lordmarcovan on CollecOnline, management, safe-keeping, sharing and valuation solution for art piece and collectibles.
  • Options
    lordmarcovanlordmarcovan Posts: 43,218 ✭✭✭✭✭
    If your pics are too big a filesize, you can either upload them to another image hosting service, or scale the size down by reducing the jpeg quality (if they are in jpeg format). You should also crop unnecessary blank border space off as much as possible.

    Explore collections of lordmarcovan on CollecOnline, management, safe-keeping, sharing and valuation solution for art piece and collectibles.
  • Options
    Thanks all. very informative. image
  • Options
    mgoodm3mgoodm3 Posts: 17,497 ✭✭✭
    For resizing I use Microsoft photo editor that came with XP. Go to image/resize and you can make it what ever you want. typically shoot for around 400 X 400 with a jpg compression around 75.

    For attaching the pic I use the upload box and hit "view file" for the one I want. It bring up your pic in a small window. right click on the image click "properties" and copy the address shown and use the IMG header with your pasted address on your post.
    coinimaging.com/my photography articles Check out the new macro lens testing section
  • Options
    nwcsnwcs Posts: 13,387 ✭✭✭
    ttt for the recent newbies and for the one year anniversary of this post (Although a bit late). I think I'll let it fade into obscurity after this.
  • Options
    lordmarcovanlordmarcovan Posts: 43,218 ✭✭✭✭✭
    TTT since the question's come up again recently, and this is the best tutorial on the forums.

    A special gold medal should be awarded to nwcs for creating this thread. image

    Newbies, take note of the above info!

    Explore collections of lordmarcovan on CollecOnline, management, safe-keeping, sharing and valuation solution for art piece and collectibles.
  • Options
    LeeGLeeG Posts: 12,162
    image

    Great Info here!!!! Appreciate all the help on this one. I've been struggling also getting quality pics to post. Bought the QX3 also. Lee
  • Options
    RussRuss Posts: 48,515 ✭✭✭
  • Options
    ttt


    image
  • Options
    ttt
  • Options
    anablepanablep Posts: 5,032 ✭✭✭✭✭
    let's see if this works

    image
    Always looking for attractive rim toned Morgan and Peace dollars in PCGS or (older) ANA/ANACS holders!

    "Bongo hurtles along the rain soaked highway of life on underinflated bald retread tires."


    ~Wayne
  • Options
    RussRuss Posts: 48,515 ✭✭✭
  • Options
    Type2Type2 Posts: 13,985 ✭✭✭✭✭
    TTT image The "Posting Pictures" topic comes up so much, I figured I'd insert some info here for quick reference.

    If you are new and want to experiment posting pictures, go to the Navigation area at the top of this page and scroll down to the "Testing Forum". There you can practice inserting pictures before you do it in a "real" thread.

    One of the easiest ways to put images into your messages is to get a free Photobucket account to host your images.

    Here is an instruction link to a thread on how to do it:

    How to Post Images Using a Free Photobucket Account

    ----

    Below is info I cut and pasted from a post made by CU Coin Forum member "Jonesy". I don't know for sure if he created it but thank him for posting it previously in the Coin Forum.

    NOTE: I am currently adding screenshots below the text description to try to make it easier to see some of this procedure.

    To put pictures with your post, there are a few things you will need to know.

    1. Go to the top of the web page screen where it say's navigation. Click on customize and click WYSIWYG editor to NO.
    2. When you Post or reply to a post, you should see 14 Icons on top of the open message text.
    3. The fourth Icon should resemble a picture frame with a mountain in the picture.
    4. This is the IMAGE icon. You will use this to place images on your post or replies.
    5. Upload your images on the PCGS site, This is the easiest way to get pictures posted.
    6. Getting your pictures on your post or reply from the PCGS site requires you to do this.
    A. Click on the IMAGE icon.
    B. Type in the IMAGE BOX http://forums.collectors.com//attachments/
    C. After typing that in type in your file name exactly as it appears! Ex. 1913buff67o.jpg
    D. You then have in the box line of the IMAGE http://forums.collectors.com//attachments/1913buff67o.jpg
    E. Hit enter, This puts the address with the (HTML Code) image tags on your post
    F. Click on preview to make sure you got the file name right. If you did, your picture will appear in a separate box. If you did it wrong, you will get a white box with red X in it.
    G. If everything went okay, you can put text in. BTW you can put text in before the picture, and or after the picture.

    For Newbies, To upload a picture to PCGS.
    On the bottom of the screen where you post or reply, you see a square the says Attach File(s).
    Click on this and you see a browse button. Click on the Browse button and choose the picture file you want to upload to PCGS. The file has to be smaller than 50kb or it won't accept it. Click on the file you want, then click Open. After doing this you will notice an upload button on the right of the screen.
    Click it. You will see your file load to the PCGS site.

    This ought to get you going. Remember if you delete a file from your upload box, that image will no longer be seen wherever you posted it. Don't post just anything. This will clog PCGS's servers. Okay, Get to sharing!!

    -----

    Here is a Guide in work on how to load image files from external (outside the PCGS sever) sources:


    Hoard the keys.
  • Options
    image[/URL]
    Test
  • Options
    winkywinky Posts: 1,671
    Doesn't work with my MacbookPro or maybe I don't work with it.image

Leave a Comment

BoldItalicStrikethroughOrdered listUnordered list
Emoji
Image
Align leftAlign centerAlign rightToggle HTML viewToggle full pageToggle lights
Drop image/file